In ENGR 216, you are learning about classic Newtonian physics in engineering lab. In this article, we will walk you through setting up your computer, connecting to Jetson, and some common commands you will need throughout the course.
To work comfortably the engineering labs, please take a look at Command Lines Basics.
Setting up your computer and connecting to Jetson
You will be collecting data through the Jetson system. For your computer to communicate with Jetson, you will need to connect to it every time you open a new session.
Preparing your computer for ENGR 216
Depending on your device operating system (Windows or MacOS), you will connect to the Jetson Linux machine differently.
For Windows users:
Download MobaXterm Installer Edition from their official website.
Make sure that you have unzipped the file before you hit download.
In MobaXterm, start a new session.
For Mac users:
You will not need MobaXterm. Instead, you will connect directly to Jetson via your terminal. To open your terminal, do ⌘ Command + Space, and search for Terminal.
Connecting to Jetson
For both Windows and MacOS users, once you have a new terminal open:
Make sure that your WIFI connection is turned off. You will need WIFI turned off while working with Jetson.
Check that you have connected your machine and Jetson via the cable provided.
In a new terminal, copy and paste:
ssh ubuntu@192.168.10.2
The password is: ubuntu. The password will not show up when you type it, so keep typing. Once you are done, hit enter.
After you have been connect, MobaXterm will ask you for a password and a username to save the password for future use, and Mac will ask you to authorize your connection. Continue as instructed.
Linux Commands Cheatsheet
What you are looking at in terminal or MobaXterm is the Command Lind Interface (CLI) just like you have seen working with Python in ENGR 102. This time, you will learn to use the Linux commands to communicate with Jetson. Listed below are the most common commands that will show up time-to-time in ENGR 216 and 217 lab.
To quickly copy the command, you can use the copy button on the top right corner of code blocks.
Action
Command
Connect to Jetson
ssh ubuntu@192.168.10.2
Copying a file
cp <file you want to copy> <where you want it to be>
This means in the examples folder, look for the tracking folder, then the file 4_track_and_print_with_camera_input.py. Copy the file then put this in this directory, hence the ”~“.
In future labs, you will need to do adjustments to the provided python script to calibrate the camera. Because the original files are protected for future use by other students, you will need to copy the file out of their directory to make edits.
nano 4_track_and_print_with_camera_input.py
Note that you do not see any of the leading directory. This is means you are editing the file that is in the same folder or directory that you are.
After editing the script, you can run it by doing
python3 4_track_and_print_with_camera_input.py
And stop it by ⌃ Ctrl + C once you have enough data.
Saving the result to your computer
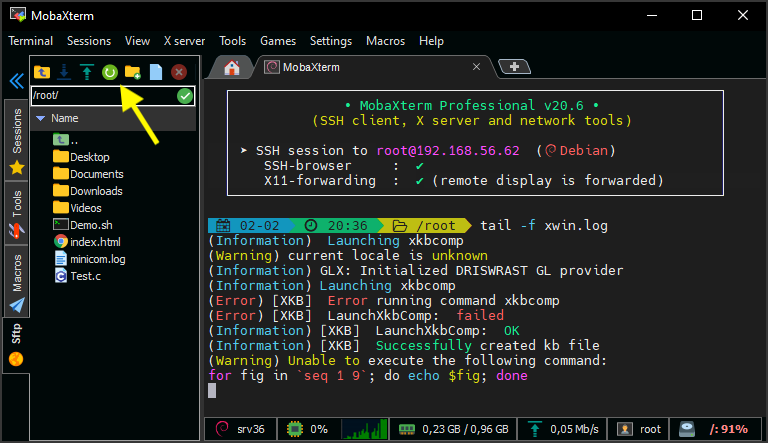
For Windows users, click the refresh circular button of the side panel, then scroll down to find the file you want. Saving it is as easy as right click > Download. It should take no more than a few seconds to save it to your computer.
For MacOS users, because you are working purely in a CLI, you need to save the file a bit differently. In a new terminal:
scp: secure copy. It transfer a file from one remote machine to another
ubuntu: the username you use on the remote machine, in this case, the Jetson.
@192.168.10.2: the IP address of the remote machine
The colon ”:” separate the machine address and the file location on it
The period ”.” means this directory
“./Desktop” means the Desktop folder of this computer. This copy the file directly to your desktop.
An example of what you will usually see being used:
scp ubuntu@192.168.10.2:example_4.csv ./Desktop
Help! This is a lot of information.
Yes, we know, but you do not have to remember all of these in one sitting. Bookmark this page so you can refer to it during lab. After a couple of labs, all of these will become second nature.
Up next
Now that you are comfortable with working with MobaXterm or the CLI, we are now good to introduce you to the first lab.